Wood veneer is one of the most versatile and sustainable materials in modern woodworking, yet many people don't fully understand what it is or why it's so valuable. Whether you're a DIY enthusiast planning your first project, an architect specifying materials for a commercial space, or a homeowner considering cabinet refacing, understanding wood veneer will open up a world of design possibilities. In this comprehensive guide, we'll explore everything you need to know about wood veneer – from its basic definition and manufacturing process to choosing the right type for your project. By the end, you'll understand why veneer has been the secret behind beautiful woodwork for centuries and how it can transform your next project.
What Exactly is Wood Veneer?
Wood veneer consists of thin slices of natural wood, typically less than 1/40 inch (0.6mm) thick, that are carefully cut from logs and applied to core materials like plywood, MDF, or particle board. Think of it as the "skin" of the wood – capturing all the beauty of natural grain patterns and color variations while maximizing the use of precious timber resources. Unlike what some might assume, wood veneer is not "fake wood" or a cheap alternative. It's real wood, offering the same warmth, grain patterns, and natural beauty as solid lumber but in a more versatile and sustainable form. In fact, many of the world's finest furniture pieces and architectural installations use veneer specifically because it allows for design possibilities that solid wood cannot achieve.
Key Characteristics of Wood Veneer:
- Thickness: Usually between 0.016" to 0.050" (0.4mm to 1.3mm)Composition: 100% real wood (for natural veneer)
- Flexibility: Can be applied to curved and complex surfaces Stability: Less prone to warping and cracking than solid wood
- Sustainability: One log can produce 30-40 times more decorative surface than sawing into boards
History of Wood Veneer
The art of veneering dates back over 4,000 years to ancient Egypt, where craftsmen discovered they could create more elaborate designs by slicing precious wood thinly and applying them to less expensive materials. Egyptian furniture makers used primitive copper saws to cut thin sheets of ebony and ivory, which they then glued to cedar and other common woods.
During the Roman Empire, veneering techniques advanced significantly, and the practice spread throughout Europe. The Renaissance period saw veneering reach new artistic heights, with intricate marquetry and parquetry designs adorning the furniture of nobility. The Industrial Revolution transformed veneer production with the invention of the veneer lathe in the 1800s, making it possible to produce consistent, high-quality veneers at scale. Today's computer-controlled slicing machines can achieve precision that ancient craftsmen could only dream of, yet the fundamental appeal remains the same: maximizing the beauty of exceptional wood.
How Wood Veneer is Made - Manufacturing Process
Modern veneer production combines traditional woodworking knowledge with advanced technology to create consistent, high-quality products. Here's a detailed look at each step of the process:
Step 1: Log Selection and Preparation
The journey begins in the forest or log yard, where experienced buyers select logs specifically for veneer production. Only the top 1-2% of harvested logs meet veneer-grade standards. Buyers look for:
- Straight, cylindrical trunks with minimal defects
- Interesting grain patterns or figure
- Appropriate species characteristics
- Proper size (diameter and length)
Selected logs are stored in climate-controlled log yards and kept moist to prevent cracking. Many facilities spray logs continuously with water or store them in ponds until they're ready for processing.
Step 2: Conditioning the Logs
Before cutting, logs must be properly conditioned to achieve the right moisture content and temperature. This critical step involves:
- Soaking: Logs are submerged in hot water vats (140-180°F) for 24-72 hours
- Steaming: Some species require steam treatment instead of soaking
- Temperature monitoring : The goal is to soften the wood fibers uniformly throughout the log
This conditioning process makes the wood pliable enough to cut cleanly without tearing or checking while maintaining the integrity of the grain structure.
Step 3: Cutting Methods – Creating Different Grain Patterns
The cutting method dramatically affects both the appearance and yield of the veneer. Three primary methods are used:
Rotary Cut Veneer
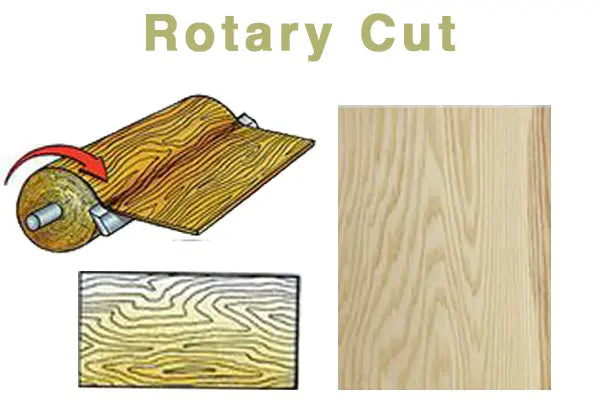
-
Process: The lo
g is mounted on a giant lathe and rotated against a stationary blade, peeling off a continuous sheet like unwinding a roll of paper
- Appearance: Produces a bold, variegated grain pattern as the blade cuts through successive growth rings
- Yield: Most efficient method with minimal waste
- Best for: Plywood manufacturing, paint-grade applications, and projects where cost-efficiency is prioritized
- Grain pattern: Wide, bold, and often wild-looking
Plain Sliced (Flat Cut) Veneer
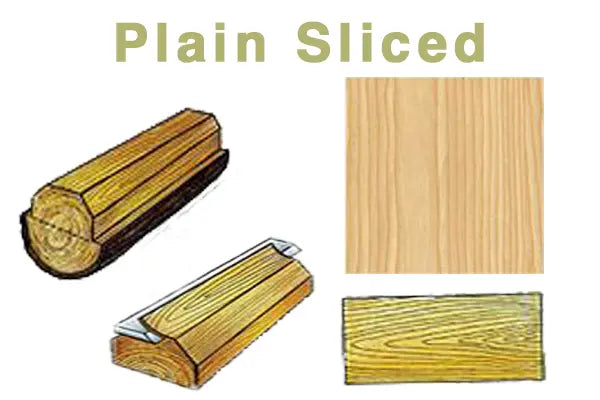
- Process: The log half (flitch) is mounted on a slicer that moves up and down, cutting parallel to a line through the center of the log
- Appearance: Creates a cathedral or flame-like grain pattern in the center with straighter grain on the edges
- Yield: Moderate efficiency with more waste than rotary
- Best for: High-end furniture, architectural panels, and decorative applications
- Grain pattern: Traditional "cathedral" appearance most people associate with wood
Quarter Sliced Veneer

- Process: The log is cut into quarters, then sliced perpendicular to the growth rings
- Appearance: Produces straight, parallel grain lines with ray fleck in some species (especially oak)
- Yield: Lower yield but premium appearance
- Best for: Fine furniture, musical instruments, and applications requiring grain consistency
- Grain pattern: Straight, uniform lines with possible ray fleck
Rift Cut Veneer

- Process: Similar to quarter slicing but at a slight angle (15 degrees) to minimize ray fleck
- Appearance: Very straight grain without the ray fleck pattern
- Yield: Lowest yield, making it the most expensive
- Best for: Modern furniture and contemporary designs requiring linear grain
- Grain pattern: Perfectly straight, parallel lines
Half-Round Slicing
- Process: A hybrid method where the log is mounted off-center on a lathe
- Appearance: Combines characteristics of both rotary and plain slicing
- Yield: Better than plain slicing but less than full rotary
- Best for: Projects requiring both economy and enhanced grain appearance
- Grain pattern: Modified cathedral with some straight-grain
Step 4: Drying and Conditioning
Fresh-cut veneer contains too much moisture for immediate use. The drying process involves:
- Initial moisture content: 50-80% depending on species
- Target moisture content: 6-12% for most applications
-
Drying methods:
- Conveyor dryers with controlled temperature and airflow
- Veneer is fed through slowly to prevent cracking or curling
- Some delicate species require air drying
- Flattening: Dried veneer passes through roller presses to ensure flatness
- Conditioning: Final moisture equilibration in climate-controlled rooms
Step 5: Clipping, Grading, and Matching
Quality control begins with careful inspection and preparation:
Clipping
- Veneers are trimmed to remove defects along the edges
- Sheets are cut to standard widths
- Any splits or cracks are removed
Grading
Veneers are graded based on:
- AA Grade: Premium face quality, excellent color, and grain matching
- A Grade: Face quality, minor characteristics allowed
- B Grade: Back quality, more natural characteristics present
- C Grade: Utility grade with unlimited natural characteristics
Matching
For projects requiring multiple sheets, veneers are matched using various methods:
- Book Match: Consecutive sheets opened like a book, creating mirror images
- Slip Match: Consecutive sheets placed side by side without flipping
- Random Match: Sheets assembled without regard to grain or color matching
- End Match: Sheets matched both horizontally and vertically
Step 6: Backing and Packaging
Depending on the end use, veneers may receive backing materials:
- Raw veneer: No backing, requires careful handling
- Paper backing: Adds stability and ease of handling
- Fleece backing: Provides flexibility for curved applications
- Phenolic backing: Creates a rigid, pre-finished panel
- PSA (Pressure Sensitive Adhesive): Peel-and-stick application
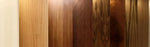
Types of Wood Veneer
Understanding the different types of veneer helps you choose the right material for your project:
By Origin
Natural Wood Veneer
- Cut directly from logs
- Each sheet is unique
- Displays authentic grain patterns and color variations
- Available in hundreds of species
- Can be stained and finished like solid wood
Engineered (Reconstituted) Veneer
- Made from fast-growing, sustainable species
- Wood is sliced, dyed, and reformed into blocks
- Provides consistent grain and color
- Often mimics expensive or endangered species
- More affordable than exotic natural veneers
By Species Category
Domestic Species
Common North American veneers include:
- Oak (Red and White): Classic grain patterns, excellent staining
- Maple: Clean, consistent grain, takes stain well
- Cherry: Rich color that deepens with age
- Walnut: Premium dark wood with varied grain
- Ash: Strong grain similar to oak but lighter
- Birch: Smooth, even texture, economical choice
Exotic Species
Imported species offering unique appearances:
- Mahogany: Rich reddish-brown with straight grain
- Teak: Golden brown with natural oils
- Zebrawood: Dramatic dark stripes on light background
- Wenge: Very dark with distinctive grain
- Bubinga: Reddish with interesting figure
- Sapele: African wood similar to mahogany
Specialty Figure Veneers
- Burl: Highly figured wood from tree growths
- Crotch: V-shaped grain from trunk branches
- Quilted: Three-dimensional appearance
- Birdseye: Small circular figures (mainly in maple)
- Fiddleback: Rippled appearance across the grain
By Backing Type
FlexVen™ (10 mil and 20 mil)
- Paper backing for stability
- Remains flexible for curved applications
- Easy to cut and apply
- Most popular for general use
Pli-Flex™ (2-ply)
- Wood-on-wood backing
- Greater stability for large panels
- Can be used without substrate in some applications
- Ideal for furniture and cabinetry
PSA Backed (Peel & Stick)
- 3M adhesive pre-applied
- Instant application
- Perfect for DIY projects
- No additional glue needed
Phenolic Backed
- Rigid composite backing
- Creates finished panels
- Waterproof and durable
- Used in commercial applications
For detailed information on choosing between these backing types, see our complete wood veneer backing guide.
Benefits of Using Wood Veneer
Economic Advantages
- Cost Efficiency: Premium wood appearance at a fraction of solid wood cost
- Yield Optimization: One veneer log produces 30-40 times more decorative surface than sawing
- Stable Pricing: Less susceptible to lumber market fluctuations
- Reduced Shipping: Lighter weight means lower transportation costs
Environmental Benefits
- Sustainability: Maximizes use of precious timber resources
- Forest Conservation: Reduces demand for solid exotic woods
- Carbon Footprint: Lower energy consumption in processing
- Renewable Resource: Can use fast-growing species for cores
Design Flexibility
- Matching Capabilities: Achieve consistent grain across large surfaces
- Curved Applications: It can be bent around radiuses, impossible with solid wood
- Stable Dimensions: Won't expand/contract like solid wood
- Weight Reduction: Important for moveable furniture and installations
Performance Advantages
- Dimensional Stability: Less warping, cracking, and splitting
- Consistent Quality: More predictable than solid wood
- Substrate Benefits: Can use engineered cores for strength
- Finish Quality: Smooth, consistent surface for finishing
Common Applications of Wood Veneer
Residential Furniture
- Dining tables and chairs
- Bedroom sets
- Entertainment centers
- Home office furniture
- Custom built-ins
Kitchen and Bath
- Cabinet refacing
- Drawer fronts
- Island panels
- Bathroom vanities
- Decorative range hoods
Architectural Millwork
- Wall paneling
- Ceiling treatments
- Column wraps
- Reception desks
- Conference tables
Commercial Applications
- Hotel lobbies
- Restaurant interiors
- Retail fixtures
- Office furniture
- Healthcare facilities
Specialty Uses
- Musical instruments (guitars, pianos)
- Automotive interiors
- Yacht interiors
- Aircraft cabins
- Humidors
How to Choose the Right Wood Veneer
Consider Your Application
Flat Surfaces (Tables, Cabinet Doors, Wall Panels)
- Best veneer types: Any backing type works - raw, paper-backed, or PSA
- Recommended species: Based on your design preference
Curved Surfaces (Columns, Rounded Furniture, Archways)
- Best veneer types: Paper-backed (10 mil) or fleece-backed for maximum flexibility
- Avoid: Thick 2-ply or phenolic-backed veneers (too rigid)
- Recommended species: Straight-grain cuts bend easier than wild grains
High Moisture Areas (Bathrooms, Kitchens, Bar Tops)
- Best veneer types: Phenolic-backed or well-sealed paper-backed
- Required adhesive: Waterproof PVA or epoxy-based (never standard wood glue)
- Essential finish: Marine-grade polyurethane or epoxy finish (minimum 3 coats)
- Recommended species: Teak, White Oak, or Mahogany (naturally moisture-resistant)
- Avoid: Open-pore species like Red Oak or Ash without proper filling
High-traffic areas (Commercial Spaces, Table Tops, Reception Desks)
-
Most durable species:
- Maple (Janka hardness: 1,450)
- White Oak (Janka hardness: 1,360)
- Hickory (Janka hardness: 1,820)
- Wenge (Janka hardness: 1,630)
- Avoid soft species: Pine, Poplar, or Basswood
- Required finish: Commercial-grade catalyzed lacquer or conversion varnish
- Maintenance tip: Choose darker species or stained finishes to hide wear
Select Your Species
- Budget constraints: Domestic species or reconstituted
- Specific appearance: Match existing woodwork
- Grain preference: Plain, quarter, or rift cut
- Color requirements: Natural or stain-grade
Determine Backing Needs
- DIY projects: PSA backing for easy application
- Professional installation: Paper or fleece backing
- Large panels: 2-ply or phenolic backing
- Curved applications: Flexible paper backing
Calculate Quantity
- Measure surface area
- Add 10-15% waste factor
- Consider grain matching requirements
- Order sequential sheets for matching
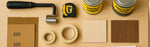
Working with Wood Veneer: Basic Guidelines
Tools Needed
- Sharp veneer saw or knife
- Straightedge
- Veneer tape
- Appropriate adhesive
- Roller or veneer press
- Sandpaper (220-320 grit)
Basic Application Steps
- Prepare substrate: Sand smooth, clean thoroughly
- Cut veneer: Always cut slightly oversize
- Apply adhesive: Follow the manufacturer's instructions
- Position veneer: Work from the center outward
- Press firmly: Remove all air bubbles
- Trim excess: Use sharp knife and straightedge
- Sand lightly: Only the surface, carefully
- Apply finish: Same as solid wood
Common Mistakes to Avoid
- Using dull cutting tools (causes splitting)
- Applying too much adhesive (causes bubbling)
- Inadequate pressing (leads to delamination)
- Sanding through veneer (irreparable damage)
- Ignoring grain direction (affects appearance)
Caring for Wood Veneer
Proper maintenance is essential to preserve the beauty and longevity of your wood veneer surfaces. While veneer is durable and long-lasting, it does require specific care techniques to maintain its appearance.
Key Maintenance Tips:
- Regular dusting with soft, microfiber cloths
- Immediate cleanup of spills to prevent staining
- Use of appropriate wood cleaners (pH-balanced, non-abrasive)
- Protection from direct heat and moisture
- Periodic application of protective finishes
Common issues like water rings, ink stains, and heat marks can be addressed with proper techniques. However, using the wrong cleaning methods or harsh chemicals can cause permanent damage to the veneer surface.
Learn More: For detailed instructions on cleaning, stain removal, and long-term maintenance of your wood veneer, read our complete guide: How to Clean and Maintain Wood Veneer
Frequently Asked Questions
Is wood veneer real wood?
Yes, wood veneer is 100% real wood, just sliced very thin. It has the same grain patterns, color variations, and natural characteristics as solid lumber.
How thick is wood veneer?
Most wood veneers range from 0.016" to 0.050" (0.4mm to 1.3mm) thick. Standard commercial veneer is typically around 1/40" (0.025" or 0.6mm).
Can you stain wood veneer?
Absolutely! Wood veneer accepts stain just like solid wood. Always test on a sample piece first and use light coats to avoid over-saturation.
How long does wood veneer last?
With proper care, wood veneer can last for generations. Many antique furniture pieces with original veneer are still beautiful after 100+ years.
Is veneer furniture cheap quality?
Not at all. Some of the world's finest furniture uses veneer for its superior grain matching and design possibilities. Quality depends on craftsmanship, not whether veneer or solid wood is used.
Can you refinish wood veneer?
Yes, you can sand and refinish veneer carefully 1-2 times. Always use fine grit sandpaper and work cautiously to avoid sanding through.
What's the difference between veneer and laminate?
Veneer is real wood; laminate is a printed plastic surface. Veneer can be stained and refinished; laminate cannot. Veneer shows real grain and texture; laminate is a photograph.
How do you apply wood veneer?
Common methods include contact cement, PVA glue, or PSA (peel-and-stick) backing. The method depends on your project and skill level.
Can veneer get wet?
Veneer itself can handle moisture similar to solid wood, but the adhesive and substrate are often the weak points. Always use appropriate finishes for moisture protection.
Why use veneer instead of solid wood?
Veneer offers better grain matching, lower cost, environmental benefits, design flexibility, dimensional stability, and the ability to use exotic species affordably.
What veneer backing options does LEDGEBAND offer?
We offer multiple backing options to suit any application: paper-backed (10 mil and 20 mil), PSA (peel-and-stick), and 2-ply wood-on-wood. Our experts can help you choose the right backing for your specific project needs.
Do you offer trade discounts?
Yes, LEDGEBAND offers competitive pricing for contractors, cabinet makers, and design professionals. Contact us for info our volume discount pricing.
What exotic wood veneers does LEDGEBAND stock?
Our exotic veneer inventory includes premium species like Bubinga, Madrone, Wenge, Sapele, Myrtle, Teak, Elm, and many more. We maintain one of the largest exotic veneer selections in the country, with many species available for immediate shipping.
Quality Indicators: What to Look For
Premium Veneer Characteristics
- Consistent thickness throughout
- Minimal or no defects
- Clear, defined grain patterns
- No discoloration or staining
- Flat sheets without curling
- Sequential numbering for matching
Red Flags to Avoid
- Excessive mineral streaks
- Numerous pin knots or defects
- Wavy or buckled sheets
- Inconsistent thickness
- End splits or checking
- Poor color consistency
Types of Veneer Grading Standards
Face Grades
- AA: Premium architectural grade
- A: Architectural grade, minimal characteristics
- B: Quality grade with natural characteristics
- C: Utility grade, natural characteristics throughout
Back Grades
- 1: No defects, suitable as face
- 2: Minor defects, smooth surface
- 3: Open defects allowed
- 4: Major defects acceptable
The Smart, Sustainable Choice for Modern Woodworking
Wood veneer represents the perfect marriage of traditional craftsmanship and modern sustainability. By understanding what veneer is and how to work with it, you open up endless possibilities for beautiful, cost-effective woodworking projects.
Whether you're refacing kitchen cabinets, building custom furniture, or designing commercial spaces, veneer offers advantages that solid wood simply cannot match. Its combination of authentic wood beauty, design flexibility, and environmental responsibility makes it an intelligent choice for any project.
Ready to start your veneer project? Browse our extensive collection of domestic and exotic wood veneers, available in various cuts and backing options. With over 30 species in stock and expert guidance available.